
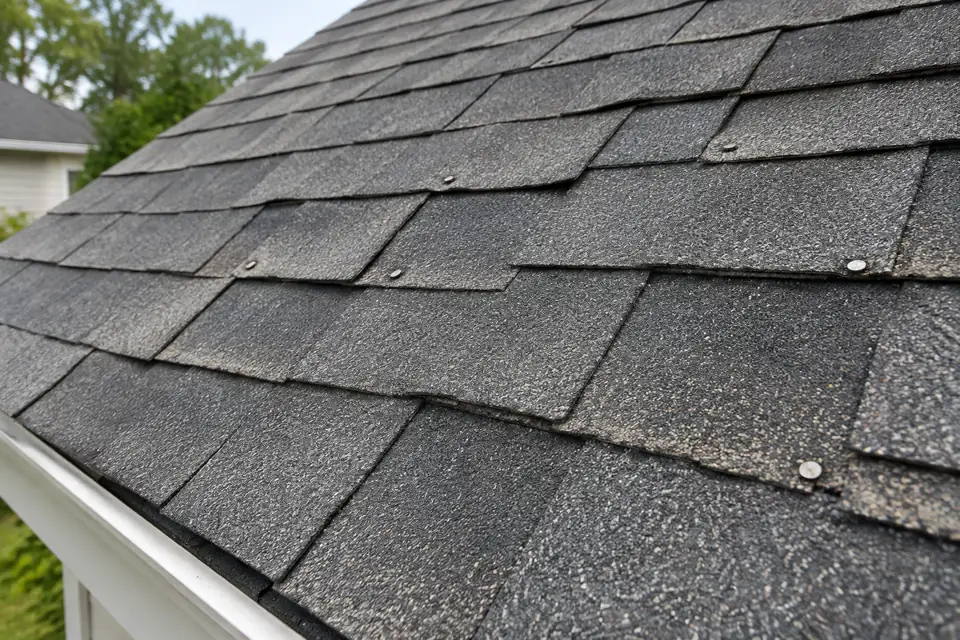
A bad roofing job shows up as shingle lines that wander or change spacing, shingles that lift, crease or blow off in the first storms, nail heads you can see, flashing that is missing or smeared with sealant where walls and chimneys meet the roof, no metal edge at the eaves and rakes, blisters within the first year, and nails and debris left in the yard. Most of the defects that matter most, such as nails placed too high, are hidden under the shingles. If you suspect a problem, photograph it, tell the roofer in writing while the workmanship warranty is still in force, and have the roof looked at by someone who did not install it.
What to look for, at a glance
| Where | What poor work looks like | What it should look like |
|---|---|---|
| Nailing | Nail heads showing on the surface, shingles that lift easily or blow off | Nails hidden under the course above, in the nailing zone the maker marks |
| Exposure | Rows that wander, or the visible part of each row changes height | Even rows at the exposure the shingle's instructions give, such as 5 5/8 inches for one maker's line |
| Joints | Seams lined up straight up the roof on every other row | Seams offset from row to row, unless the maker allows otherwise |
| Eaves and rakes | No metal drip edge, or shingles hanging far past the edge or cut short of it | Drip edge along the edges and shingles overhanging it by a set amount |
| Walls and chimneys | Sealant in place of metal, or one long strip of flashing along a side wall | Step flashing woven into each course, with counter-flashing above it |
| Surface | Blisters within the first year, knife cuts, scuffed patches | A clean, even surface |
| Yard | Nails, shingle scraps and wrappers left behind | Old material hauled away and the site cleaned |
The measurements that follow come from one manufacturer's published instructions and from ARMA, the asphalt shingle makers' association. Your roof should be installed to the instructions for the shingle on it, and to your local code. Ask your roofer for a copy of those instructions; they are the standard the work is judged against.
Nailing: the defect you cannot see
Nails hold a shingle down, and the self-sealing strip keeps its lower edge from lifting. InterNACHI, the home inspectors' association, calls the sealing strip the most important part of a shingle's resistance to wind and the fasteners the second. Common nailing faults it describes:
- High nailing. Nails placed above the sealant strip catch only one layer instead of two. InterNACHI says this drastically reduces wind resistance, and that it is common but still improper. The usual sign is shingles that slip, crease or blow off in the first strong winds.
- Nails in the sealant strip. They can stop the shingle from sealing.
- Overdriven or angled nails. A nail gun set too hard cuts into the shingle and weakens it.
- Underdriven nails. A nail head left standing will wear a hole through the shingle above it over time.
- Exposed nails. Nail heads left in the open corrode and the holes can widen until they leak. InterNACHI says manufacturers recommend replacing shingles with exposed fasteners and treat caulking the heads as a temporary repair.
- Too few nails. InterNACHI says typical strip and laminated shingles take four nails, and six where the local building authority designates high wind. Owens Corning's instructions for its Duration shingles call for six nails and spots of roof cement on slopes steeper than 21 inches per foot.
- Nails that are too short. Owens Corning's instructions say every nail must go at least 3/4 inch into a wood deck, or all the way through it by at least 1/4 inch.
You can check nailing only by lifting sealed shingles, which breaks the seal. InterNACHI says home inspectors usually leave fastening out of their reports for that reason. If you see shingles lifting or sliding on a new roof, that is the time to ask for an inspection of the nailing.
Exposure, alignment and joints
The exposure is the part of each row left showing to the weather. Owens Corning's instructions for its Duration shingles set it at 5 5/8 inches, with each row offset from the one below it by 6 1/2 inches, offsets of 4 to 8 inches allowed, and seams kept at least 2 inches away from a nail in the shingle below. Other shingles have their own numbers.
From the ground, look for:
- Rows that wander or change spacing. An exposure that varies means the shingle's sealing strip and nailing zone may not sit where they were designed to.
- Seams stacked straight up the roof. InterNACHI calls this racking. It says some manufacturers allow it for some shingles and at least one requires it, but used with the wrong shingle it lines up joints every other row, which raises the chance of leaks, and installers sometimes forget to go back for the nails it leaves out.
- Mixed batches. Owens Corning's instructions warn against mixing shingles with different lot numbers. InterNACHI says shingles from different production batches on one roof can weather at different rates.
Starter course and drip edge
The first row of a roof is a starter strip, laid along the edges so the first full row of shingles has a clean surface to seal to, as Owens Corning's instructions put it. Owens Corning's instructions call for its starter shingles to overhang the drip edge by 1/4 to 3/4 inch at the eaves and rakes, and for shingles to extend at least 1/2 inch and no more than 1 inch past the edge, unless the drip edge profile allows them to sit flush. Signs of a problem: shingle tabs at the eave with no starter beneath them, shingles cut short of the edge, or shingles hanging well past it.
Drip edge is the metal strip bent over the edge of the roof deck. ARMA says it helps keep water from getting under the shingle edges and rotting the wood. Its technical bulletin, published May 6, 2025, calls for drip edge of a corrosion-resistant material that:
- extends at least 2 inches onto the roof deck and at least 1/4 inch below it;
- is nailed every 8 to 10 inches;
- goes under the underlayment at the eaves and over it on the rakes.
If you see bare wood at the roof edges of a new roof, ask about the drip edge. Our guide to what happens during a roof replacement shows where it goes in the sequence.
Flashing at walls, chimneys and skylights
Every place the roof meets something else needs flashing. InterNACHI says the building code calls for it where a roof meets a wall, where the slope or direction changes, and around chimneys, vents, skylights and other penetrations. It also says a side wall on an asphalt shingle roof should always be flashed with step flashing, short pieces that overlap each shingle below and are overlapped by each shingle above, with counter-flashing or the wall covering over the top. Owens Corning's instructions call for step flashing of corrosion-resistant metal, at least 4 by 4 by 8 inches and 2 inches wider than the shingle exposure.
Things to look for:
- Sealant instead of metal. A bead of caulk or roof cement where a wall, chimney or skylight meets the roof is not flashing.
- One long strip along a side wall instead of step flashing.
- No kickout at the bottom of a wall. InterNACHI says where a wall runs past the edge of the roof, the flashing should turn out from the wall at the eave to throw water clear of the siding. Without it, water can run into the wall.
- Old flashing reused where it is rusted or bent. Ask whether flashing was replaced.
Our guide to skylight and chimney flashing covers the parts and what repairs cost.
Ventilation
A new roof should come with a ventilation plan. NRCA says a balanced system has nearly equal vent area low, at the eaves or soffits, and high, at or near the ridge. InterNACHI says blisters that appear within the first year are usually caused by poor ventilation, not a manufacturing defect, and can shorten the life of the shingles. Owens Corning's instructions say ventilation must meet local building codes.
Signs to check: blisters on the new shingles, or vents at the ridge with none low on the roof to feed them. Our guide to how much attic ventilation a roof needs covers the rule and the fixes.
Cleanup and the final walk-through
The Better Business Bureau advises confirming that your contractor is responsible for taking away all the old material and cleaning up the site when the work is done, and putting debris removal in the contract. Walk the property with the foreman before the crew leaves and look for:
- nails in the lawn, beds and driveway, and on the roof itself;
- shingle scraps and wrappers in the gutters, which can block them;
- damage to gutters, siding, landscaping or the driveway;
- tool damage on the new shingles. InterNACHI notes that knife cuts and dropped tools from careless installers are not unusual, and that newly installed roofs are among the most prone to scuffing from foot traffic.
Note anything you find in writing before you make the final payment.
What to do if the work is poor
1. Document it. Take dated photos from the ground and, if you can, from inside the attic. Photograph leaks, stains and anything in the yard. Keep the contract, invoices, the permit and every warranty paper together. The FTC advises keeping copies of warranty documents and receipts and a record of every contact and repair attempt.
2. Tell the contractor in writing. Describe the problem, attach photos and ask for a date to fix it. The FTC suggests sending letters about a warranty problem by certified mail so you have proof of delivery.
3. Use the workmanship warranty. Installation errors are covered by the contractor's own workmanship warranty, not the shingle maker's standard warranty, which NRCA says covers defects in the manufacture of the material. NRCA says many contractors give one or two years of workmanship coverage, and that there is no industry standard, so read yours for its length and exclusions. Owens Corning's instructions state that the manufacturer is not responsible for problems caused by not following them. Our guide to what a roof warranty covers explains the three kinds.
4. Get an independent inspection. Ask a roofer who did not do the work, or a home inspector, to inspect the roof and give you a written report with photos. Tell them what you suspect, and ask whether they will check the nailing on a few shingles, since InterNACHI says inspectors usually leave fastening out of their reports unless they lift shingles. Our guide to what a roof inspection costs covers the price and what the report should include.
5. Escalate if the contractor will not fix it. The FTC says that when a seller will not resolve a warranty problem, you can report it at ReportFraud.ftc.gov and to your state attorney general, and contact your local or state consumer protection office. This page is general information, not legal advice; for a large loss, ask a lawyer about your options.
If water is coming in now, deal with that first: our guide to emergency roof repair covers temporary protection.
Frequently asked questions
Is it normal for a new roof to leak?
No. A leak on a new roof points to a problem with the installation or damage during the work. Flashing at walls, chimneys, vents and skylights is one of the first places to have checked. Photograph it, call the roofer in writing, and check how long your workmanship warranty lasts; NRCA says many run only one or two years.
Why are shingles blowing off my new roof?
Shingles that have not sealed yet, or that were nailed too high, lift easily. InterNACHI says high nailing drastically reduces wind resistance and that shingles installed in cold weather may not seal for months. Ask the roofer to inspect the nailing and hand-seal loose shingles.
Can I tell if my roof was nailed correctly without going up?
Not for certain. The nails are hidden under the course above, and checking them means breaking the seal on some shingles. Shingles that slide, crease or blow off early, or nail heads you can see, are signs worth an inspection.
Does the shingle warranty cover a bad installation?
NRCA says a manufacturer's warranty covers defects in the manufacture of the material. Installation errors fall to the contractor's workmanship warranty. Our guide to what a roof warranty covers explains the extended warranties some makers sell that add workmanship coverage.
Should I make the final payment if I see problems?
Put the problems in writing first and agree on when they will be fixed. The FTC advises not making the final payment until the work is finished and you are satisfied with it.
Where this information comes from
HomeAnvil does not publish inspection data of its own. Each fact on this page comes from the source named beside it, all read on September 26, 2026:
- InterNACHI, Mastering roof inspections: asphalt composition shingles, parts 17 (where flashing is required), 18 (step flashing), 20 (kickout flashing), 24 (racking), 25 (fasteners, and inspectors leaving fastening out of reports), 26 (nail depth, over- and underdriven nails, four and six nail patterns, high nailing, exposed nails), 34 (shingles from different batches), 35 (blisters and ventilation), 37 (tool damage and scuffing), 51 (high nailing and blow-off, shingles installed in cold weather) and 52 (the sealing strip and fasteners in wind resistance). The pages carry no dates.
- Owens Corning, Duration series shingles installation instructions, publication 10014283-L, July 2026: exposure, offsets, lot numbers, nail penetration, the steep-slope nailing pattern, starter course and shingle overhang, step flashing size, ventilation and the manufacturer's responsibility. It is quoted as one example of a manufacturer's instructions; other shingles have their own.
- ARMA, Installation of drip edge at eaves and rakes, May 6, 2025: the purpose of drip edge, its dimensions, nail spacing and placement with the underlayment.
- NRCA, Resources for consumers: manufacturer and workmanship warranties, the one-to-two-year norm, and balanced ventilation.
- Better Business Bureau, Hire a trusted roofing contractor: cleanup and debris removal in the contract.
- FTC Consumer Advice, Warranties: keeping records, certified mail, and reporting to the FTC and your state attorney general.
- FTC Consumer Advice, How to avoid a home improvement scam, July 2022: holding the final payment until the work is done.
Building codes and manufacturer instructions differ by product and by place, and your local code decides what your roof must meet. We will update this page when these sources change, and the date above will say when.
Related guides
 What does a roof warranty actually cover?A shingle warranty covers manufacturing defects, a contractor's warranty covers installation. How prorating, wind, algae, transfers and voiding work.
 How much does a roof inspection cost?A roof inspection typically costs $125 to $383, about $252 on average. Drone inspections run $150 to $400 and infrared $400 to $600. What each one checks.
 What happens during a roof replacement, step by step?An asphalt shingle roof usually goes on in one to three days. What happens before, during and after, from tear-off and deck repair to flashing and cleanup.
 How much attic ventilation does a roof need?Code calls for 1 square foot of net free vent area per 150 square feet of attic, split between intake and exhaust. How vents work, warning signs and costs.
 Skylight and chimney flashing repair: what it costsReplacing roof flashing costs $150 to $1,000; reflashing a skylight, $300 to $500. Step, counter, apron and cricket flashing, and signs it's failing.
 How to find and fix a roof leak, and what it costsA roof leak repair typically costs $350 to $1,500, about $800 on average. How to trace a leak from the attic, what to do first and what each fix costs.